dcl-edit V2 is currently available on Windows, Linux, and Mac.
This guide will help you to get started with using dcl-edit V2 effectively, so that you can create amazing virtual scenes with ease. We’ll be covering everything from the basic layout of the software to advanced features. So let’s get started!
Installation
dcl-edit can be installed using npm, the package manager for Node.js.
- Make sure you have Node.js and npm installed on your computer. If you don’t have it installed, you can download it from the official website (https://nodejs.org/).
- Install the Decentraland SDK with the command:
npm install -g decentraland - Open a terminal or command prompt and run the following command:
npm install -g dcl-edit
Starting dcl-edit
Before starting dcl-edit, make sure you’re in the root directory of a Decentraland project. If you haven’t created a project yet, you can do so by running the following command in a terminal or command prompt:
dcl init
Once you’re in a Decentraland project, you can start dcl-edit by running the following command:
dcl-edit
This will launch the dcl-edit interface, where you can start creating and editing your virtual world.
Save your scene via the ‘File’ menu.
Basic Usage
dcl-edit allows you to create and edit multiple scenes for your Decentraland project. You can switch between scenes by using the ‘File’ menu, and selecting ‘Open Scene’ or ‘Save Scene’. You can also create a new scene by selecting ‘New Scene’. Place assets into a scene by dragging and dropping them from the Asset Browser. Using the below controls, you can arrange your scene to your liking.Controls
- Left-Click: Select an entity in the scene
- Mouse-Wheel: Zoom in/out
- ALT + Right-Click + Mouse Move Up/Down: Continuously zoom in/out
- ALT + Left-Click + Mouse Move: Have the camera rotate around the point in the scene that’s under the mouse cursor
- Middle-Mouse-Button + Mouse Move: Pan camera
- Right-Mouse-Button + Mouse Move: Look around
- while in look-around mode: press W,A,S,D,Q,E for flying around
- F: Focus on the currently selected entity
- E: Translate Mode
- R: Rotate Mode
- T: Scale Mode
- CTRL-D: Duplicate selected entity
- CTRL-S: Save scene
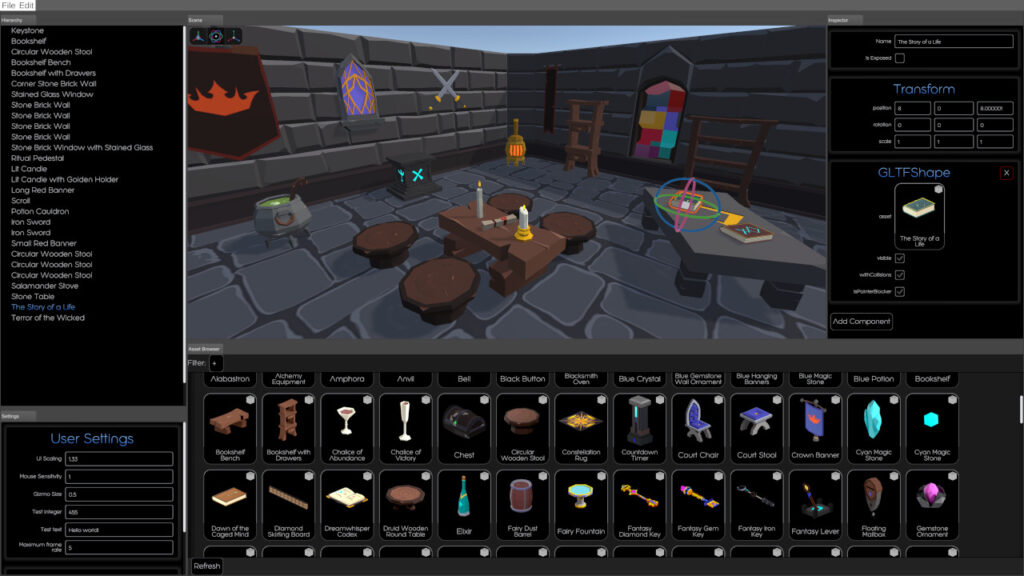
Panels
dcl-edit features a customizable layout, allowing you to arrange the panels to your liking. The panels in dcl-edit include:- Scene: The main panel where you view and edit your Decentraland scene.
- Inspector: The panel where you can view and adjust the properties of entities in your scene, such as position, rotation, and scale.
- Hierarchy: The panel where you can view and manage the entities in your scene.
- Asset Manager: The panel where you can access and add assets to your scene.
- Settings: The panel where you can adjust the settings and preferences for dcl-edit.
Hierarchy
The hierarchy panel lists all entities in the scene. Right-clicking in the hierarchy allows you to add primitive shapes to your scene (Empty-, Box-, Sphere-, Plane-, Cylinder-, and Cone entities).
You can structure the hierarchy by dragging and moving entities around. You can also drag entities onto other entities for parenting.
Asset Manager
The Asset Manager is a panel in dcl-edit where you can access and add assets to your scene. There are two sources of assets in the Asset Manager:
- Local Files: You can add assets to your scene by using glb or gltf files stored in a folder called “assets” in the root of your Decentraland project.
Note: Assets located outside the “assets” folder will not show up in the Asset Manager. - Builder Assets: This is a collection of all the assets that are available in the legacy builder from Decentraland. However, note that smart items do not work.
You can add assets to your scene by clicking on them, or dragging and dropping them from the Asset Manager to the Scene panel.
Note: Currently, thumbnail loading may become slow when opening multiple folders at once.
Adding the Scene to Your Project
To use the scene you’ve created in dcl-edit, you’ll need to add some code to your src/game.ts file:
- Import the SceneFactory with the following line of code:
import { SceneFactory } from "dcl-edit/build/scripts/scenes"
This will give you access to the create functions for all your scenes. - Have the SceneFactory create your scene and assign it to a variable. This is done by calling the appropriate create function with the name of your scene. For example, if your scene is called “MyNewScene”, your code would look something like this:
const scene = SceneFactory.createMyNewScene()
Accessing Entities
In order to access entities from your scene in code, make sure the “Is Exposed” checkbox is checked in the inspector on the entity in dcl-edit.
Now you can access exposed entities in the code with:scene.exposed.[entityName].entity
Or access a specific component with:scene.exposed.[entityName].[componentName].
As an example, here’s how you can move the entity “My Entity” up by five units: scene.exposed.myEntity.transform.position.y += 5.
Note that scene is typed, so you can take advantage of your IDE’s autocompletion and exploration features to make your work easier.
Custom Components
Custom components can be created by writing a normal Decentraland component and providing additional information about the component’s structure in JSON format. This allows for more complex and customizable components to be used in your scenes. For more information on creating custom components, please refer to the documentation.
Scenes in Scenes
If you save a scene in your project’s /assets folder, it can be added to another scene, just like any other asset. This functionality is comparable to Unity’s prefab system. To add a scene to another scene
- Add or select an entity in dcl-edit
- Press the “Add Component” button and select “Built-in > Scene”
- Click on the asset property
- Select your scene in the Asset Browser
Please note that there can’t be any circular dependencies between the scenes. Make sure to structure your scenes in a way that avoids any loops
Feedback
Thank you for taking the time to try dcl-edit V2 out. Your feedback is extremely important to us, not only for dcl-edit, but also for this guide itself. We would love to hear your thoughts and suggestions to make sure everything is clear, concise, and easily understood. You can provide feedback in two ways:- Via our Discord Channel (which is the preferred and fastest option).
- By writing an Email to dcledit@thedac.info